 Today it's my turn to share a tutorial with you for Bugaboo Stamps, you can see my final product on the Catch the Bug Challenge Blog! So are we ready to see what we are learning to make today? Okay, here it is, we are making a boxed envelope! Now you might be thinking what the heck is that?! Well, its a deep envelope so that you can mail those great layered cards without messing up the card!
Materials:
1 - 8 1/4" x 8 1/4" sheet of DP or Colored Paper
Bone Folder
Cutter or Scor-Pal
Double Sided Tape
Scissors
Start by holding the 8 1/4" x 8 1/4" paper on an angle and measure 2 5/8" and make a scored line with your Bone Folder and Cutter or Scor-Pal. Measure over 1/4" of an inch from your first score line and create another score line.
 You will then want to rotate the paper 90 degrees and measure in to the 3 5/8" mark and create a scored line, then measure over 1/4" and create another score line. Rotate the paper another 90 degrees and measure 2 5/8" and make a scored line, again measure over 1/4" of an inch from your first score line and create another score line. Once more rotate the paper to the last triangle, another 90 degrees and measure in to the 3 5/8" mark and create a scored line, then measure over 1/4" to 3 7/8" and create another score line.
  You should now have something to look like this, I marked the difference and the places that were scored for you to see. The next step is to take your scissors and cut away where the scores overlap.
 Now fold on all the scored lines at once, so that the tabs are all folding up.
  Next step adhere double sided tape to the inside edges of the shorter sides as shown.
  Then folding up the bottom attach the bottom to the double sided tape.
  Now, you will end up with this small triangle shape extending pasty the side, you can certainly leave it, but I decided to use my scissors to cut it down, it looks a bit better in my opinion, more finished.
  My box envelope is now created, so I decided to make this envelope so it matched my multi layered card by using the same image on my envelope that is on my card, I placed it in the bottom left corner so that the box envelope can still be mailed!
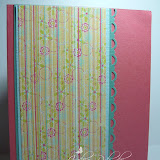
  Just to show you what sort of card I use for this envelope box, here is a few shots of the card I made to match this creation.
 Not only is the main image base pop up on another layer, but I also made three layers for the image itself.
  Just to show you how well these box envelopes work, here is the finished card inside! I do hope that you enjoyed today's tutorial, I had a great time with this card and with sharing with you this easy way to mail your thicker cards. Have a great day!
Stamps: Poppi Intertube from Bugaboo Stamps; Paper: Whisper White, Lemon Tart, We Are Memory Keepers White Out DP, Only Orange, Pacific Point; Ink: N1 Neutral Grey No 1, N3 Neutral Grey No. 3, B05 Process Blue, Y08 Acid Yellow, YR04 Chrome Orange; Accessories: Pop Dots, Scissors, Double Sided Tape, Bone Folder


8 comments:
Lovely card and a great way to make sure it arrives un-squashed!
(Lyn)
This is just brilliant ! I sometimes make boxes for a card but your idea is much better ! I love it ! And your card is sooooo cool ! Thank you so much ! Smiles from Catherine
Jackie--I love your card!!!! Great Idea with the envelope. I'll be trying this. See you soon:)
Jackie, I'm always wondering how the hell I'm going to get some of the cards I make into an evelope, and NOW I know!!! Awesome tutorial! :D MWAH!
Awesome tutorial Jackie! Fabulous card too!
fabulous tutorial Jackie! love your penguin card too!
This is brilliant & I'm going to try it. Thanks heaps.
Great tutorial. Wish I would have looked at it on Tuesday. I spent forever trying to make one of these yesterday. TFS!
Post a Comment